
Sheet Metal Valve Cover Restoration & Cordless Paint Sprayer?
- Daniel Jessup

- Apr 1
- 6 min read
Updated: Apr 30

Restoring a Y Block engine sheet metal cover involves more than just a coat of paint.
It sounds simple. What can really be complicated about restoring an otherwise simple part of the Y Block engine? After all, it is just a sheet metal valve cover. While many subscribers may have enough experience to feel comfortable diving into such a job, these days both the website and the channel are daily picking up people who are new to the hobby. If processes like these interest you then read on. If you are really, really interested in further details then you can watch the video at the link located at the end of this article.
From nasty to neat, let's review the process...
Degreasing
This is the most difficult part in my opinion. Any early overhead valve engine did not have the greatest of crankcase ventilation systems and most owners used non-detergent oil in their engines. This made an awful elixir that would ensure a heavy film of oily crud on the inside of the valve covers. All of us know that the exterior will have to be cleaned, but the interior is always the worst.
There are many ways to degrease a valve cover. Off the shelf, products such as Gunk, Purple Power, Simple Green, and others can be used. Cleaning solvent like that which fills most parts washers is a good agent, and many end up using kerosene or diesel fuel to clean out the junk. In this part of the process I ended up using EasyOff oven cleaner. For the price, it is difficult to beat the results. Whatever you use, ensure that you have plenty of ventilation and that you handle any flammable liquids appropriately.

Well used valve covers always include a heavy film of oil residue that is hard to clean.
Remove the Sheet Metal Lip
Ford Motor Company manufactured several different versions of valve covers for the Y Block. The least prevalent would be the aluminum versions that adorned the 1955-57 Ford Thunderbirds. In the late 50's, there were sheet metal covers that had the letters "F-O-R-D" stamped across the top. Of course, Mercury had their own special valve covers with the stamping of "Mercury" across the top. A large majority of Y Block valve covers just have a smooth top like the set we are restoring in this article. The early years of the sheet metal valve covers included a metal lip that helped to keep the gasket in position when the valve cover was installed. This is not necessarily a negative addition when new, but the problem really lies in what gets trapped between the lip and the sheet metal of the cover. It is impossible to get the valve cover completely clean without removing this lip.
The lip is spot welded to the valve cover in several places. All that one needs to do is to cut out the spot welds and of course the nasty, built-up gunk can be removed. You can use a grinder or a cut off wheel, but I also employ a spot weld tool as shown below. (the link to this wonderful tool is included below if you wish to purchase one as well - it is really for body work.)

This spot weld splitter is a must-have tool for anyone doing DIY restoration at home.
Link to the Seam Buster: https://amzn.to/4bVXO6G
Note: As an Amazon associate I do receive a very small commission for every sale made. However, there is no cost to you for this commission.

The sheet metal lip is a realy nuisance and gets in the way of cleaning the valve cover.


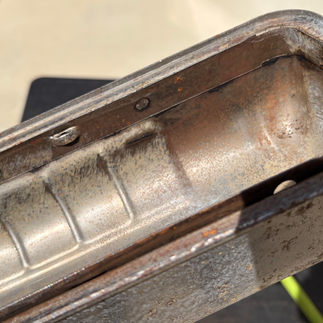
Removing the lip revealed all the residue that was hiding in the seam.
Straighten Imperfections
If your valve covers are completely straight with no dents or bumps or dings then count your blessings. You are one of the few that have been given a miraculous gift! All kidding aside, I addressed the major imperfections with a hammer, impact socket, and my wood top on the workbench. (See the video below for an example of this type of work.) The sheet metal is not so thick that it cannot be reworked. You can take this to any level of perfection you like; it all depends on what you are after in the end. Remember that the darker your final coat of paint the more that any imperfection will be noticed.


Y Block valve covers are notorious for being overtorqued!
Clean and Paint
After removing the spot welds, the lip, and the years of built up oily crud, it was time to remove any rust and old paint. I did this in my blasting cabinet and used glass beads. (To me, glass beads always give a great finish to such parts that really do not need primer and are just wating for a top coat.) If you do not have a blast cabinet, consider using a wire wheel either on a small bench motor or one of those drill attachments that really do a good job removing anything foreign to the metal.
For paint, there are many options. I chose Rustoleum Glass Black enamel from a one quart can instead of using a spray can. I have sprayed gallons of Rustoleum over the years for various proejcts (new subscribers can go back through various posts in the Paint and Body category to view articles that include the work.) I have a few dedicated HVLP spray paint guns that are set aside only to spray Rustoleum products. The recipe is a simple mix of 1:4 for Lacquer Thinner and Rustoleum (thin, I know) but to then spray that through a gun that has a 1.0 mm tip. Works like a charm every time and lays out super smooth.

Rustoleum Gloss Black Enamel was the paint of choice for the valve covers.
However, for this go around a company named Gochifix had contacted me a few weeks prior requesting that I test one of their newest products - a cordless HVLP paint sprayer. For this product review and test run we now have enough material for its own blog article, but you can expect a detailed video being posted to the YouTube channel very soon.

During the process, a Gochifix cordless HVLP paint sprayer was tested and reviewed.
The Gochifix spray paint gun rather impressed me. While it did not spray out as good as my tradtional HVLP air compressor guns, I believe it would have come extremely close in immediate results if I had thinned the paint a bit more (I used a 1.5 mm tip for this spray gun, and I did not thin the paint as much as I did with my traditional HVLP spray gun.) In the end, this is really not a problem with Rustoleum for the video shows very clearly that it is very difficult to see any differences in finishes between the two guns.
If you do not have an air compressor for a traditional spray gun and you want to the ability to spray the paint of your choosing (to get away from rattle cans, etc) then look no further than this affordable alternative. It does come with SIX different sizes of nozzles.
Link to the Gochifix HVLP Spray Paint Gun: https://amzn.to/4uZgdbD

I was amazed at how easy it was to clean the Gochifix HVLP cordless spray paint gun.
Affix the Decals
Once the paint is cured, it is time for the decals. For this project I purchased a set of the 272 c.i. versions because of my 1955 Ford and my memories when I was 16. These are really not decals but are in fact stickers. These are a little easier to install than the decals that require a quick soak in water (much like the decals we used in the model car kits back in the day.)
I do encourage you to use alcohol or a very good degreaser/cleaner on the surface before you install any decals or stickers. This will ensure a very good surface free from any oil, residue, or anything else that would fight against the adhesive.

There is nothing like the bling of a fresh set of Y Block Ford valve covers!
Coming Up Soon...
Plans are in the works to install this set of valve covers on the 1955 Ford. The good thing about Y Block valve covers - they all swap among any 239, 256, 272, 292, or 312 engine. The footprint is the same. The only difference rests in the stud height between the two types (sheet metal and aluminum). The aluminum valve covers stand just a bit higher than the sheet metal variety and need to have taller studs.
While installing valve covers on a Y Block Ford engine is nothing too much to write home about, for this install I will be using prototype gaskets from Real Gaskets Tennessee. Meaning - the first silicone gaskets for the Y Block valve covers! If the prototypes work well then RGT will put them into production. They are waiting on my test and review. I also had them too up for a silicone valley pan gasket and will be testing that one in the future as well. Exciting days and happy to see companies making parts available for the Y Block Ford V8 OHV engine.
The Hot Rod Reverend
aka Daniel Jessup


Comments