
1955 Ford Part 23: Differential, Seat Belts, and Door Panel Work
- Hot Rod Reverend
- Oct 2, 2017
- 6 min read
Updated: Dec 27, 2019
Differential, Seat Belts, and Door Panel Work
(Note: You are reading the progress from a project that began in August of 2014. The information in this post was originally dated in July and August of 2017.)


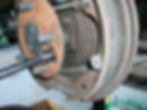
Time to pull the rear end assembly. If you take a closer look at the tag, you will see it reads "3.30" - these are the original gears to the car that came with a 272 Y Block V8 and an automatic transmission called a "Fordomatic." Since I installed a 3 speed manual and overdrive I am convinced that we need to go to a higher ratio. My dad says that he has a higher set of gears at his house in North Carolina so by faith I began the disassembly of the rear end.
First the axles had to be pulled:


The seals and bearings on both sides were in good shape so I did not replace those.

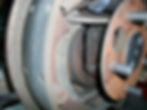
The gears were indeed a set of 3.30's. While the pinion and ring showed little wear, the spider gears were looser than normal and the pinion seal itself was leaking. The cavity was relatively clean so I wiped it out pretty good and prepared the mounting surface for a new gasket and a rear end assembly that was waiting for me down in North Carolina.


When I got to North Carolina, this is what I found:

Yep - that's the Hot Rod Reverend, his dad, and his son EJ out Crappie fishing on a lake not too far from my dad's house. We had quite a bit of fun that morning - my son caught a few Bass, but I caught the largest Crappie that day.

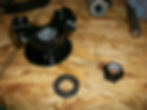
Dad had a few car parts out back that could not fit into the garages so he let me go through and pick out what I needed. Thankfully the one rear end showed some promise and was not too difficult to disassemble.


The set of gears ended up being a set of 3.79's. They looked to be in pretty good shape so I removed the "pumpkin" from the housing, installed the 3.30's for dad's sake, and took off back up the road to Ohio. It took some time to clean everything up because of the years of crud, but we eventually painted the exterior, painted the pinion flange, and installed a new pinion seal as well. The gasket I had ordered from a restoration parts company had arrived by the time I was back in Ohio, so that was prepared for installation also.


The "new" rear end is ready for action!

(a couple of weeks later...)
It had now come time to remove the doors so that we could access the door jambs much more easily for paint and so that we could work on the doors themselves. After removing the guts of each door, my son Ethan (EJ) helped me remove the bolts. We did mark the locations of the hinge plates with a drill.


After both doors were removed I hung them on the rack as shown (scroll above to the top of this post to see what we started with).


As you can witness in the photos above, the rack held both doors in a good position to remove all of the old paint and rust. I also welded up any of the holes that had been drilled into the door previously and got both doors ready for light body filler as needed. Unfortunately the rack did not give good access to the underside of the door so each door had to be placed on a panel stand. The passenger door needed to be blasted, but there were no holes because of rot and the door was actually quite solid.


Both doors received some body filler as needed - it take a while to get both doors to the place where I was happy with the "straightness" of each door but I think the final outcome was worth it.
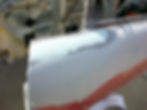


Both doors received body filler, a few coats of primer-surfacer, and copious amounts of block sanding. All of the painting was done outdoors in the mornings with little-to-no bugs or dust to get into the paint.


They are both clear coated now, and one door has been buffed. Hopefully I can get the door seal and the door handle back on soon. Things are starting to come back together!

Oh - did I mention that somewhere in the midst of all this I put a set of rear shocks on the car. They are quality gas-charged units.
While doing some body work in the driveway the other day, one of the fellas in the neighborhood stopped by to offer some help in the way of a modified sanding block. Basically it is a section of tire tread that you glue a piece of sandpaper down to the inside of the tread and use the flexibility of the grooves to match the contour of the body panels. Thank you Chris!


Recently Mama got involved in the project again by asking what seat belts I had in the car. I told her that I had installed a set of lap belts way back when I bought the car years ago, but I did add 3 sets of lap belts for the rear seat several years back. Then she wanted to know why there was no shoulder restraints.
“If my kids are going to be riding in that car we need to have should restraints! That’s a metal dash you know…” And then she gave me one of those looks from the wife that basically said, “Mama hath spoken!” After thinking about it for a few moments I wondered to myself whether or not a 3 point set up for the front seat belts was indeed doable. I remembered that the company where I purchased the lap belts had 3 point retractable units for sale that matched the lap belts I had purchased, and I told her that I would look online. Before I did that though I would have to find out the color match to the current lap belts I had and see what needed to be ordered. So, off to the basement on a hunt for the belts. After a few minutes of searching, lo and behold but what do I discover?
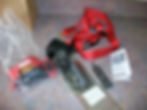

That’s right – I had purchased these way back when and had completely forgotten about them. I took them out, examined the hardware, and reviewed the instructions. This looks like it will work after all, but I am going to need to do some major modification to the b-pillar because there is no boss to bolt the pivot to, and the metal is not flush to the sheet metal garnish. There is a pull strap boss that Ford put there and it looks like this:

The first thing to do was to double check the measurements on the belts themselves to make sure there was enough length, the fit of the retracting mechanism and how that would sit, and then the drilling of holes to place the receiver belts. From what I could tell, everything was pretty straight forward until we got up that b-pillar – that was going to be an exercise that would test my welding skills for sure. The kit comes with the belts, retractors, bolts, washers, and the large plates that go behind the sheet metal. It also included the “boss” for the shoulder pivot that had to be welded into each b-pillar.
So we drilled the holes for the receiver belts first right above the transmission tunnel.

Next, I marked and modified the L brackets that the retractor bolts to, drilled the corresponding holes, and then installed those. I did plan to leave the horizontal leg under the carpet and the vertical leg behind the quarter window interior panel. The way the hardware was shipped included loose nuts to go behind the L bracket on the vertical leg. I decided to weld these nuts to the vertical leg since access would be hidden once the interior panel was in position.


After that it was on to the b-pillar to cut out the old boss for the strap (that was just sheet metal anyway as you can see above) and get the adapter plates ready to weld into the b-pillar. I did have to trim those ¼” plates, but I took the trimmings and welded them back to the plate to use in the mounting under the lip of the b-pillar.


I slipped each plate into position tightly, but not after marking where the access hole should be. Remember that on these 2 door sedans the sheet metal garnish has a sizable hole where the straps are secured through the garnish as the screw/bolt is secured into the b-pillar. I plan to use that same hole for the pivot on the seat belt. The welding went extremely well as I started the weld pool on the thicker metal and slowly pushed my way up so that the surrounding metal would work its way into the adapter plate. Very pleased to say it turned out just as strong and sturdy as it could be.


Not too much later after this new metal work, the pillars were primed so we could begin work on the door jambs.