
1955 Ford Part 7: Priming Oil Pump and Firewall Repaint
- Hot Rod Reverend
- Sep 10, 2017
- 9 min read
Updated: Apr 14, 2025
(Note: You are reading the progress from a project that began in August of 2014. This information was originally dated from April and May of 2015.)
Priming Oil Pump and Firewall Repaint

You can see the distributor boss pictured above. That is what we are shooting for here. If you look down in that hole you can see the top of the oil pump drive rod. Take your drill, set it to REVERSE (remember that counterclockwise is the way the distributor and that hex shaft will rotate when the engine is running). Now take your 1/4" extension setup and place it on the shaft... HOLD IT! Did you fill the block with 4 or 5 quarts of oil? Thought so. You did - but I almost forgot. By the way, another thing you should do... ahem, is uh, to walk around your block and make sure you are BUTTONED UP! Check out the following photo:

Yep, that's an oil slick! I had forgotten to reattach the oil pressure guage to this port on the galley, so when the oil pump began to do it's job of course oil came squirting out this hole. Thankfully I caught it pretty quickly.

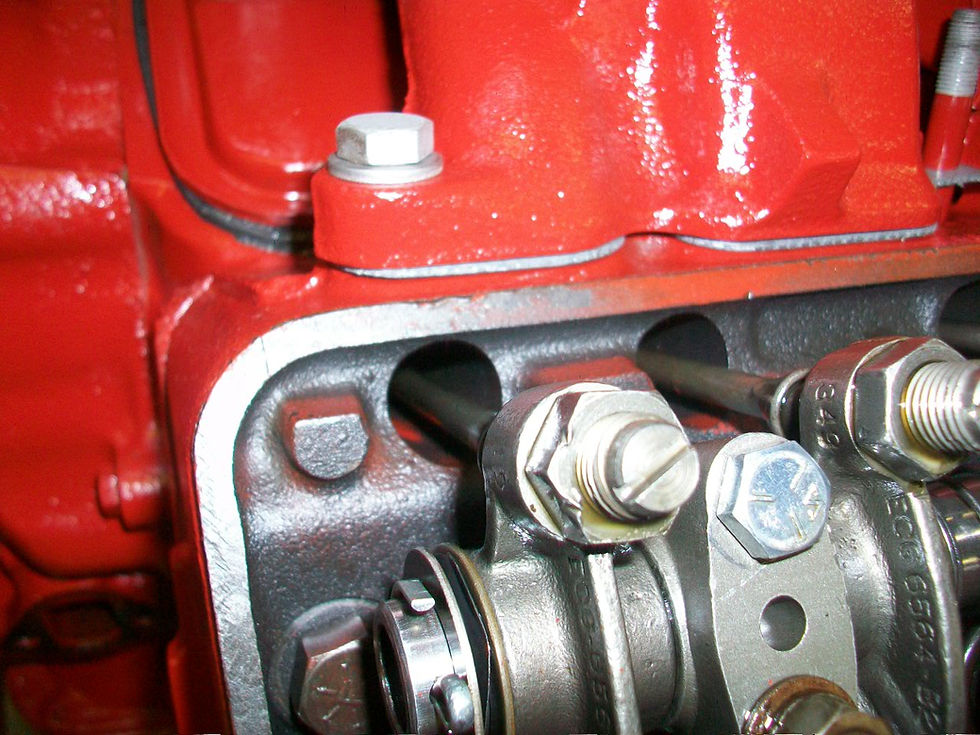
You don't need to go at super fast rate of speed, just touch it off and let it rotate a little bit. You can actually do this with a speed handle for a socket but this certainly takes the sweat out of it. While you are spinning the drill it will be about 10-15 seconds or so and you will feel a load... yep, we struck oil. "Drill baby drill" Keep going and watching your rocker arms to make sure you are getting oil up there. If you have a new build, it is going to take some time. The rockers are the furthest point away from the pump that the oil has to travel, so every other orifice and what have you will fill up first. If you have an early cam that is "cross-drilled" then rotate your cam so that you can mate up the feed holes. BOTH rocker shafts should be dripping oil and you should be seeing puddles under the valve springs like so:

Now on setting that distributor. With your valve cover off the passenger side head, take a look at the # 1 cylinder and the corresponding valves. You want to get TDC at the compression stroke so that you can give that ignition initial time.

Go back to your crank dampener/timing pointer and bring up the TDC mark just as the intake valve has closed (exhaust will be closed as well... double check this by checking valve lash on both rocker arms for #1). Most guys like to set their initial time to exact TDC on the timing pointer. I guess this is good practice, but since Y blocks like a lot of advance I usually bring the timing pointer to 4 degrees or so and then get ready to install the distributor. You will note my timing mark on the crank dampener. I have removed the black paint where the timing marks are located and I have sprayed it with clear gloss engine paint to highlight the difference from the rest of the dampener.

Next, I take the distributor and mark the location of #1 Cylinder/Plug Wire by fitting the cap to the distributor and making a sharpie line right underneath the center of where #1 is located.


Something else I like to do is get some anti-seize on both lips of the distributor boss on the block and a little on the distributor itself where it will mate to the block. How many times have you tried to pull a seized Y block distributor? I don't know why particularly, but the Y block is NOTORIOUS for seized distributors. In my lifetime of probably dealing with 15 different Y blocks I have never owned, seen, or worked on one that had the top end oiling problems. But about half of the ones I have dealt with had a seized distributor. You may also note the ACCEL pointless ignition. While most everyone and their grandmother go the Pertronix route I have used the ACCEL kit with 100% success and no ignition failures over the past 10 years or so. (I say that now, wait until I crank this thing up or take it out for the initial ride after all the work is done!) Seriously though, I do like the kit and with an ACCEL super coil there is no resistor needed. You can leave the key on with no problems, etc. (unlike Pertronix Ignitor Series 1 testimony)

Just to follow up from what I posted in the last section, here are some photos of the Exhaust Manifolds. Now that I look at the casting numbers, I know that the EDB is not a 1955 number. I believe they are to be ECH if they are original to the car right? anyone know? I am not quite sure why the different numbers in the earlier years - maybe you guys can chime in here. I bought a set of the B9's, blasted them too, and have now coated both sets twice and are letting them dry out. This stuff works pretty good in my opinion.

I also cleaned up a couple of nice chrome valve covers and used some contact cement to set RUBBER valve cover gaskets to them. The gaskets work very well when you need to remove your valve covers a few times over their "life" when you are setting valve lash, etc. I know some guys will use cork and seal the cork to the valve cover, then grease the end of the gasket that mates to the head - that works too. I have done that with intake manifold gaskets before.

I need to find some chrome or stainless acorn nuts for the valve covers - they would look better with those. I do have new decals to put on the valve covers - I like the 1957 "Ford Interceptor" decals - kind of my favorite FoMoCo look.

I did get the Valley Pan cleaned up last night, and I have a rubber gasket for that too. As you are aware sometimes these valley pans you find can be bent up into a banana shape by the last gorilla who wrenched it down. Since there are only two bolts that hold it down to the block, they are prone to leak also so make sure there is a good seal all the way around. If you use silicone or some kind of a gasket maker, go sparingly with it.
Hopefully soon I can start installing the other bolt-on parts and get this thing fired up again, check for leaks, make sure the plumbing is good, time the engine and get it ready to reinstall in the car.
----------------------------------------------------------
First the Valley Pan: I used some acetone to remove the paint around the rim of the block where the gasket goes. After that I used a very small thin bead of black hi-temp silicone gasket maker, aligned the rubber gasket on the block and then prepped my pan to make sure we would mate up well to the block. As you know, sometimes these things can be interesting because of warpage over the years caused from over tightening. Put a thin bead of gasket maker on the pan as well so that both the top and bottom of the gasket have a thin coating of silicone so that you will get an excellent seal.


The trick with the valley pan is to get your gasket to cooperate as you slide the pan over the block, between the edges of the intake ports on your heads (if you know Y blocks this can be a pain - especially if you have shaved your heads). I use a very small flat blade screwdriver to position the edges of the rubber gasket before I install the two grommets and bolts. Once the pan and gasket are positioned properly all the way around, I tighten down the bolts alternatively until the goo just begins to squeeze out of the gasket/pan mating area. Stop and let it rest for a while and go on to tackle something else while the silicone sets up. I like to install the teapot PCV mount at this time...


As you can see I have the intake manifold on the heads in the above photos. That was simply to see the placement/orientation of the spout so that I did not come too close to the intake. Obviously these photos show the location being too close, so I loosened up the screw and turned the spout clockwise so that is was between the distributor and the intake. I removed the intake and got back to the valley pan.
If you will look at the above photo you can see the intake above the valley pan. This was to check for clearance and to check BOLT LENGTH! For instance, certain holes in the head go right into the passage way of the push rods. I suggest you double check the length of your bolts so as not to be in harm's way. Obviously, you will need the valve covers off to verify this. Be sure to check the front and the rear of the manifold. I like to do this check without the gaskets even, knowing that I will have a bit more clearance when the gaskets are placed between the heads and intake.
By the time you get done fooling around with all of this, you can probably go ahead and give a final torque on your valley pan. To be honest here, I really don't follow any specification, but I probe around the pan with my small screwdriver to see if the gasket is tight against the block/pan area. That really is the best way to check because you need to make sure your pan is sealed around the perimeter. Long story short ... I am very happy. Virtually no oil leaks during the 20 minute or more run, and the only water leak I had was water out the overflow tube when the t’stat was taking its time opening up (195 degree). The only drip I had was from the new oil pump cover plate which I did not rebuild/install, I just installed that out of the box. Once I tightened up the offending bolt, she was all sealed up good. Here are some quick photo shots of the action tonight. Only water was used. I will be gone an entire week so I drained the block and the radiator before I came out of the shop...
I bought that stand several years ago but I had to make quite a few modifications - it was originally made for Chevy Small Block, but the mounts for the block and bell housing are obviously now Ford Y block and I also put together a simple angle iron frame for the radiator support. Once I removed the original solid steel wheels and put on taller 8" polyurethanes, this thing finally took shape and as you can tell, it is fully functional. This is the 4th engine I have had on this particular stand.
I think the brand name was "Larin" ... I bought it from Eastwood but I don't think they sell them anymore. The main problem is that the units were sold with 4" tall casters. I could not get my engine hoist legs underneath of the frame of the run stand when it was that low. How anybody else ever did it defies belief.
----------------------------------------------------------
Tonight I had a really comedic episode with painting the firewall and other interior parts. Last Saturday I had shot a little more TAMCO direct to metal primer surface and wet-sanded (yep, wet sanded) the firewall down to prep for the topcoat. I don't know about you guys but my sinuses sure like the wet sanding route. I know it's messy and you could put what I know about body work in thimble and still need a microscope, but it beats the dust and all. I have dust masks, the 3M charcoal filters, etc, but if I can get away with not having to wear them I am all for it. By the way, the TAMCO primer is the real ticket - it sprays nicely out of the gun and it is easy (soft) to sand.


Welp, after getting everything prepped for paint I decided to shoot some tonight. You guys know the drill, you get home (about 5:30 pm), eat some supper with the wife and kiddos, then remember you have to mow the lawn because there is a house showing tomorrow, do some general yard work outside, etc. Ok, now what? is there enough time to shoot some paint before it gets dark? Well, everything is masked so let's roll the car out and get the parts out on the paint rack, mix some paint and give her a go! I'm using the Eastwood brand (I think it is made by Kirker) Single Stage Urethane paint. I chose to go with the original tutone so we mixed the 60s Mustang Wimbledon White and away we go. As I pour the paint and make sure I get the right ratio I hear this rumble outside. "No way," I say to myself. "Ain't no rain in the forecast and I just came in from mowing and we are clear and we are good." Yeh right... anyway, as I pour the paint in the cup and start sealing the lid I kid you not... THUNDERSTORM! Aaarrrgghhhhh You have got to be kidding! I looked like Scamper the Squirrel running around grabbing parts, the 55, tripping over the air hose, and what have you. Now what? I have all the paint mixed so what to do? Throw away the paint and wait another day? Nah, too much Scotch-Irish in me for that! I got things set up quickly and shot in the garage after covering a few things. It really was not too bad but suffice to say it is next to impossible to get every speck of dust off the firewall before you shoot the paint! I need a paint booth for sure.


Check out the photos above. I was surprised by the high gloss look of the paint - we will see what she has when it all cures. The paint shot well, NO RUNS... imagine that! My wife even came out to give her A+ on the thing!


Comments