
1955 Ford Part 10: Hurst Floor Shifter
- Hot Rod Reverend
- Sep 20, 2017
- 8 min read
Updated: Apr 14, 2025
(Note: You are reading the progress from a project that began in August of 2014. This information was originally dated from September of 2015 to February of 2016.)
Hurst Floor Shifter
I decided a long time ago that when I pulled the old automatic transmission (original, cast iron Fordomatic that weighs about 275 lbs!) I would install an original 3 speed transmission with overdrive. This was a transmission that I had located from an acquaintance that offered the unit to me for the shipping cost, thinking that a rebuild would be in order. I did completely disassemble, clean, inspect, replace broken or worn out parts, and reassemble the entire transmission - we can write more about that later. Along the way I began searching for a period aftermarket shifter that would look like a floor shifter someone would have installed in the 50s. My first look for possibilities was on a classic car forum listing in a classified section.


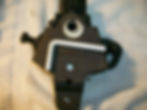
Here is a photo of the Hurst Syncro Loc Shifter that I just had delivered... not quite sure I have it all right. I could not get the shifter to go into 1st or R (just sitting on the bracket, no arms attached). I wonder if I can hook the arms up with the levers on the side of the transmission in their current position or do I have to turn these upside down? It looks as if they need to stay down from what I can tell. The shifter is only 12" above the mechanism (including the ball)... not sure this is going to be tall enough in the car. Here are a couple of photos of the interference from the bracket/OD lockout lever.


You can tell by the photos above that the lever was hitting the Hurst Bracket and leaving that small arc of grease. I put the bracket in a vise and carefully nudged it over with the vise to make the bracket widen out a little bit. This gave me about an 1/8" clearance and I am pretty happy with it after bolting everything up it looked pretty good. The shifter shifted into all positions just fine tonight with 0 play - nothing seemed sloppy at all. I did have one shifter rod from Hurst and kind of mocked it up in the shifter and put it up to an original lever on the case (after flipping it upside down). I know that Hurst made levers to replace the originals but I think these were all flat stock right? Seems like the offset of the original levers would help you keep a straigther rod since the line looks very good. Maybe Hurst uses levers that essentially have a shorter arc because they are smaller?


Before I give you part 3 here, let me say I am very happy that I have a duplicate transmission out of the car. The constant adjusting, fiddling, bolting/unbolting, removal, installation, etc is quite easy since there is a transmission on the bench. Ok, so today the postman leaves me a couple of boxes on the doorstep (actually 3 boxes but the third box contains a pair of Holley 94's to rebuild). One box holds a very nice Mastershift with a nice handle that is LOOOOOOOONG compared to the syncro loc I have and the other box contains Hurst shifter hardware arms and the like, pre-bent specifically for this overdrive transmission.
And photos of the Mastershifter (I am told it is the updated version of the syncro loc)


While things look good if you look closely you can realize that when the shifter is in second the rod is interfering with the shifter case... reason? The Mastershift case is slightly larger than the old Syncro Loc. Also, if you look at the bracket you will find that where the pivot hole lined up for the Syncro Loc, the hole does not line up for the Master Shifter.

I like the Mastershifter and the option to change out shifter arms pretty easily. It is definitely "larger and heavier" than the Syncro Loc. Back to the bench and more modifications... time to elongate some holes and to bend a rod ever so gently.
(several weeks pass and yet another decision is made to find a better unit...)
Look what Santa brought me for Christmas...


Yep - it is a Syncro Loc shifter, NOS, with a removable shift lever. The brackets and arms in the box are for Pontiac, but the bag of hardware should also be handy! And here is the install of the Christmas Hurst Syncro Loc...


for the sake of reference, here is neutral

1st Gear

2nd Gear

3rd Gear

What a smooth little shifter she is too. The line up looks good and all things are finally normal. I guess the 3rd time, er... 4th time is a charm? Now to get down to brass tacks and get this installed on the transmission in the car. Hopefully I will have some time to do it this weekend. The installation looks straightforward enough. (the next week...)
You know those times when you hear someone say, "This won't take long, only an hour or two?" and then you end up spending most of your day tackling a job that throws every problem in the book at you? Your situation defies the odds and unlike the average completion time for the project you end up adjusting, tweaking, cutting, drilling, adjusting some more, assembling, installing, re-installing, etc, etc, etc. To top it all off I even lost about 7 important pictures from my crazy camera that somehow "corrupted" photos I took! I lost track at the amount of time I spent under the car today but the end result was extremely SATISFYING. We will start from the beginning. Since the old transmission on the bench was an excellent means of mocking up all of the parts for the Hurst Syncro Loc floor shifter, it was time to remove the stock Ford shifter rods and install the assembly. Easy breezy right? After removing the original shifter arms and levers on the side of the case I installed the Hurst levers as pictured here:

That part of course was pretty easy and went well. I made sure they were on the correct pivot and oriented correctly. Next, time to remove the two upper bolts on the case and install the main bracket that looks like this...

That was a little more difficult than I first expected - there is very little area above the transmission tunnel and your hands get awfully big under there when you are trying to ratchet on things and get everything connected!

The passenger side attached pretty quickly but the driver's side was a bear - that is the side where all of the shifting, hardware, and speedometer cable go. I had to make some adjustments but as you can see at least the overdrive lockout lever still moves freely. Glad I got that one corrected on the bench!

Next came this bracket...

It attaches up front at the top bolt that secures the solenoid to the transmission. The two holes at the rear of this plate line up with the main bracket and both holes are the attachment points for the shifter itself. This part went well - no hangups.

Now we come to the shifter. The first thing I did was to put the neutral rod in place. (white, L-shaped rod in the photo below)


This white rod needs to be in place when you are lining up your shifting rods that go from the shifter to the transmission levers at the side cover. Also, keeping the rod in place while adjusting the TILT of the shifter (towards the dash or towards the front seat) is an added bonus. Next comes the hack job on the floor pan. The idea is that the shifter needs to be installed on the bracket, then using a punch mark the center of the hole you need to cut so that the shifter arm can be connected through the floor right? WRONG - not with this setup. The clearance is so small that the Syncro Loc could not even be attached to the bracketry. Great.... What to do? I decided to orient myself from above by drilling two holes. One at the pivot of the shifter (center line of shifter) and one immediately above the second hole on the bracketry (this is where the slot is located on the Syncro Loc). This took forever, but I wanted to be sure I cut out NO MORE THAN WAS NECESSARY to install the shifter. Check out the pictures below...


Those are all of my cuts. I started with the large rectangle you see, but each time I kept finding out that something else interfered, one of the stop bolts got in the way, etc. Crazy stuff I know, but I ended up with what I think is the smallest footprint for the shifter going through the floor pan.The installation of the shifter took quite some time. Checking clearances, attaching the lever, setting the tilt, etc. But this is what I ended up with concerning the amount of "throw" from the shifter... First

Second

Third

Reverse

And Neutral

So now that I had all of that squared away it was time to install the rods that attach the shifter to the Hurst levers on the pivots on the side cover. The First/Reverse rod installed without too much issue - no problems there. But, check out the interference on the Second/Third gear rod –


So..... out it came and put into the vise to be "modified" and now we're cooking! By the time I got done with all of this it was too dark outside and this 55 has no headlights so I could not swap the gears to see how we're doing in that regard. I need to set the stops anyway. The hole I made for this thing is approximately 5.5" by 4.5" and it is on that weird angle where the shift lever will be oriented far to the right and up the tunnel. Time to go shopping for something sizable. Glad it's in and I am pleased with the results so far. I did sit down in the seat several times and swapped through the gears to make sure there was no binding, etc. At first I thought the shifter might be too close to the side of the driver but I think I am going to like where it is oriented and the height of the shift lever is near perfect.
Here is a photo of the boot I picked up that will cover the shifter and the hole. It is a whole lot larger than I want it to be, but with the footprint of the shifter mechanism coming up through the floorpan I really have no choice here.

I plan to install Dynamat, or something similar, under the carpet so I guess these small sheet metal screws that came with the boot and chrome retainer are not going to work... should be easy to find a few. I am taking note also that I will have to be very careful not to harm the wiring harness sitting on the trans tunnel when I drill the holes for the boot later on.
I rebuild at least one Holley 94 or more each month, some passenger car variety, some of the truck variety (different air horn of course) - but I sell every one I build. I completely go through them, have a very good parts stash, and use an ethanol compliant kit for each one of them. The funds help the project along.


Oh, and I also found one of these to make myself a clock too. Now that my dad has one I thought I would make one too. I already have the clock for the headlight ring.
